Index
作者:沈园园 | 最后修改:2026-09-23
一、概述
AirLCD_1020 是合宙推出的一款RGB接口,带触摸,5寸屏,800*480 的LCD配件板,其中:
- 驱动IC:显示屏的驱动IC是:ST7265,触摸面板的驱动IC是:GT911;
- 适用于Air8101系列模组;
airui 是基于 LVGL 9.4 版本进行图形层封装的 LuatOS 核心库,把常用组件、事件管理、输入和基础视觉主题封装为更易上手的 Lua 接口,便于在支持 LuatOS 的设备和 PC 上统一开发。
建议使用airui来开发显示界面,airui demo参考:
https://gitee.com/openLuat/LuatOS/tree/master/module/Air8101/demo/ui/airui/single
二、演示功能概述
1、核心主程序模块
- main.lua - 主程序入口,负责系统初始化和任务调度
- ui_main.lua - exeasyui exeasyui 主程序,负责执行exeasyui的任务调度
2、显示页面模块
- home_page.lua - 主页模块,提供应用入口和导航功能
- component_page.lua - UI 组件演示模块
- default_font_page.lua - 默认字体演示模块
- hzfont_page.lua - HZFont 矢量字体演示模块
3、驱动模块
- hw_default_font_drv.lua - lcd显示驱动配置、tp触摸驱动配置和默认字体驱动模块,使用内置 12 号点阵字体
- hw_hzfont_drv.lua - lcd显示驱动配置、tp触摸驱动配置和HZFont 矢量字体驱动模块(开发中)
- hw_customer_font_drv.lua - lcd显示驱动配置、tp触摸驱动配置和自定义外部字体驱动模块(开发中)
当前演示的exeasyui V1.7.0版本还不支持同时启用多种字体,仅支持选择一种字体初始化,同时启用多种字体功能正在开发中
三、准备硬件环境
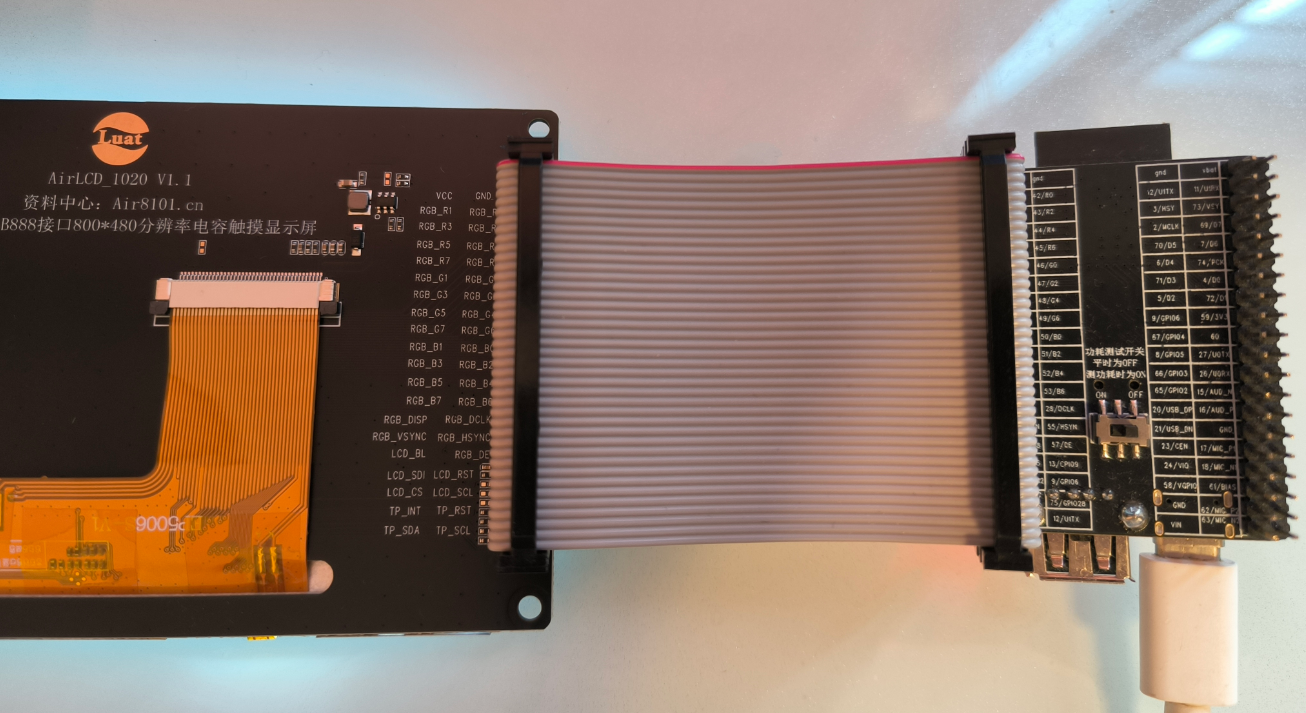
1、Air8101 核心板 × 1
2、AirLCD_1020 触摸配件板 × 1
3、双排40PIN的双头线 x 1
4、母对母杜邦线 × 6,杜邦线太长的话,会出现 spi 通信不稳定的现象;
5、TYPE-C 数据线 × 1
6、Air8101 核心板和 AirLCD_1020配件板以及AirFONTS_1000 配件板的硬件接线方式为
- Air8101 核心板通过 TYPE-C USB 口供电(核心板背面的功耗测试开关拨到 OFF 一端,正面开关打到 3.3V 一端),此种供电方式下,vbat 引脚为 3.3V,可以直接给 AirLCD_1020配件板供电;
- 为了演示方便,所以 Air8101 核心板上电后直接通过 vbat 引脚给 AirLCD_1020配件板供电;
- 客户在设计实际项目时,一般来说,需要通过一个GPIO来控制LDO给LCD和TP供电,这样可以灵活地控制供电,可以使项目的整体功耗降到最低;
- 核心板和配件板之间配备了双排40PIN的双头线,可以参考下表很方便地连接双方各自的40个管脚,插入或者拔出双头线时,要慢慢地操作,防止将排针折弯;
LCD 显示屏接线
| Air8101核心板 | AirLCD_1020配件板 |
|---|---|
| gnd | GND |
| vbat | VCC |
| 42/R0 | RGB_R0 |
| 40/R1 | RGB_R1 |
| 43/R2 | RGB_R2 |
| 39/R3 | RGB_R3 |
| 44/R4 | RGB_R4 |
| 38/R5 | RGB_R5 |
| 45/R6 | RGB_R6 |
| 37/R7 | RGB_R7 |
| 46/G0 | RGB_G0 |
| 36/G1 | RGB_G1 |
| 47/G2 | RGB_G2 |
| 35/G3 | RGB_G3 |
| 48/G4 | RGB_G4 |
| 34/G5 | RGB_G5 |
| 49/G6 | RGB_G6 |
| 33/G7 | RGB_G7 |
| 50/B0 | RGB_B0 |
| 32/B1 | RGB_B1 |
| 51/B2 | RGB_B2 |
| 31/B3 | RGB_B3 |
| 52/B4 | RGB_B4 |
| 30/B5 | RGB_B5 |
| 53/B6 | RGB_B6 |
| 29/B7 | RGB_B7 |
| 28/DCLK | RGB_DCLK |
| 54/DISP | RGB_DISP |
| 55/HSYN | RGB_HSYNC |
| 56/VSYN | RGB_VSYNC |
| 57/DE | RGB_DE |
| 14/GPIO8 | LCD_BL |
| 13/GPIO9 | LCD_RST |
| 8/GPIO5 | LCD_SDI |
| 9/GPIO6 | LCD_SCL |
| 68/GPIO12 | LCD_CS |
| 75/GPIO28 | TP_RST |
| 10/GPIO7 | TP_INT |
| 12/U1TX | TP_SCL |
| 11/U1RX | TP_SDA |
Air8101 核心板购买链接:Air8101 核心板 WiFi 4G 以太网 蓝牙 720P显示屏 200万拍照-淘宝网
AirLCD_1020 购买链接:AirLCD_1020 5寸 RGB888 800*480 电容触摸显示屏-淘宝网
四、准备软件环境
4.1 软件环境
在开始实践本示例之前,先筹备一下软件环境:
1、烧录工具:Luatools 下载调试工具
2、本demo开发测试时使用的固件为LuatOS-SoC_V1006_Air8101 1号固件,本demo对固件版本没有什么特殊要求,所以你如果要测试本demo时,可以直接使用最新版本的内核固件;如果发现最新版本的内核固件测试有问题,可以使用我们开发本demo时使用的内核固件版本来对比测试;
4、lib脚本文件:使用Luatools烧录时,勾选 添加默认lib 选项,使用默认lib脚本文件
准备好软件环境之后,接下来查看 Air8101 核心板使用说明,将本篇文章中演示使用的项目文件烧录到 Air8101 核心板中。
4.2 API 介绍
exeasyui UI扩展库:https://docs.openluat.com/osapi/ext/exeasyui/
五、程序结构
AirLCD_1020/exeasyui/
│── hw_drv
    │── hw_customer_font_drv.lua
    │── hw_default_font_drv.lua
    │── hw_hzfont_drv.lua
│── images
    │── xxx.jpg
│── tp_key_drv
    │── key_drv.lua
│── ui
    │──  component_page.lua
    │──  default_font_page.lua
    │──  home_page.lua
    │──  hzfont_page.lua
    │──  ui_main.lua
│── readme.md
5.1 文件说明
1、hw_drv:
- hw_default_font_drv.lua: lcd显示驱动配置、tp触摸驱动配置和默认字体驱动模块,使用内置 12 号点阵字体
- hw_hzfont_drv.lua: lcd显示驱动配置、tp触摸驱动配置和HZFont 矢量字体驱动模块(开发中)
- hw_customer_font_drv.lua:lcd显示驱动配置、tp触摸驱动配置和自定义外部字体驱动模块(开发中)
2、images:
xxx.jpg:演示图片文件(和lua脚本文件一起烧录,会自动放置在/luadb/目录下)
3、tp_key_drv:
- key_drv.lua:无触摸仅显示,通过按键方式进行UI交互的初始化方式正在开发中
5、ui
- ui_main.lua:exeasyui 主程序,负责执行exeasyui的任务调度
- home_page.lua :主页模块,提供应用入口和导航功能
- component_page.lua:UI 组件演示模块
- default_font_page.lua:默认字体演示模块
- hzfont_page.lua:HZFont 矢量字体演示模块
六、代码详解
6.1 main.lua
主程序文件 main.lua 是整个项目的入口点。它负责初始化系统环境。
6.2 hw_default_font_drv.lua
本文件为默认字体、lcd和tp驱动模块,核心业务逻辑为:
本文件为默认字体、lcd和tp驱动模块,核心业务逻辑为:
1、使用lcd内核固件中自带的12号中文字体;
2、根据配置的字体、lcd和tp参数,初始化exEasyUI默认使用的字体、硬件显示和触摸;
3、提供无需外部硬件的字体显示能力;
-- 使用默认12号中文字体初始化exEasyUI硬件
ui.hw_init({
    -- lcd_config参数填写可以参考合宙exlcd显示扩展库exlcd.init(param)接口说明:https://docs.openluat.com/osapi/ext/exlcd/#31-exlcdinitparam
    lcd_config = {
        lcd_model = "AirLCD_1020", -- LCD型号
    },

    -- tp_config参数填写可以参考合宙extp触摸扩展库以下三个接口说明:https://docs.openluat.com/osapi/ext/extp/#41-extpinitparam
    -- 按extp.init(param)接口说明填写tp_model、i2c_id、pin_rst、pin_int参数
    -- 按extp.set_publish_enabled(msg_type, enabled)接口说明和实际需求填写message_enabled{}列表内参数
    -- 按extp.set_swipe_threshold(threshold)接口说明填写swipe_threshold和long_press_threshold参数
    tp_config = {
        tp_model = "AirLCD_1020", -- 触摸芯片/设备型号
        -- @param message_enabled 消息类型 ("ALL", "RAW_DATA", "TOUCH_DOWN", "MOVE_X", "MOVE_Y", "SWIPE_LEFT", "SWIPE_RIGHT", "SWIPE_UP", "SWIPE_DOWN", "SINGLE_TAP", "LONG_PRESS")
        message_enabled = {
            TOUCH_DOWN = true,      -- 启用按下检测
            MOVE_X = true,          -- 启用横向滑动
            MOVE_Y = true,          -- 启用纵向滑动
            SWIPE_LEFT = true,      -- 启用左滑手势
            SWIPE_RIGHT = true,     -- 启用右滑手势
            SWIPE_UP = true,        -- 启用上滑手势
            SWIPE_DOWN = true,      -- 启用下滑手势
            SINGLE_TAP = true,      -- 启用点击手势
            LONG_PRESS = false      -- 禁用长按手势
        },
        swipe_threshold = 10,       -- 设置滑动阈值
        long_press_threshold = 2000 -- 设置长按阈值(毫秒)
    }
})
6.3 hw_customer_font_drv.lua
用户外部自定义外部点阵字体、lcd显示驱动配置和tp触摸驱动配置的驱动配置文件,目前exeasyui自定义字体功能正在开发中
-- hw_customer_font_drv是用户外部自定义外部点阵字体、lcd显示驱动配置和tp触摸驱动配置的驱动配置文件,目前exeasyui自定义字体功能正在开发中。
6.4 hw_hzfont_drv.lua
内置HZFont矢量字体功能正在开发中
-- Air8101 内置HZFont矢量字体功能正在开发中。。。
6.5 key_drv.lua
无触摸仅显示,通过按键方式进行UI交互的初始化方式正在开发中
-- 无触摸仅显示,通过按键方式进行UI交互的初始化方式正在开发中
6.6 ui_main.lua
本文件为exeasyui主程序模块,核心业务逻辑为:
1、设置主题为浅色;
2、进入演示主页面;
3、启用主循环;
local home_page = require("home_page")

-- 启动UI主任务
local function ui_main()

    -- 初始化UI主题
    ui.sw_init({ theme = "light" })

    home_page.create()

    -- 主渲染循环
    while true do
        ui.refresh()
        sys.wait(30)
    end
end

sys.taskInit(ui_main)
6.7 home_page.lua
本文件为主页功能模块,核心业务逻辑为:
1、创建应用主窗口并配置背景颜色;
2、配置子页面工厂函数,管理各演示页面的创建;
3、创建标题和功能按钮,提供页面导航功能;
4、处理按钮点击事件,实现页面切换;
local home_page = {}

--[[
创建主页界面;

@api home_page.create()
@summary 创建并配置应用主页面
@return nil

@usage
-- 在UI主程序中调用创建主页
home_page.create()
]]

function home_page.create()
    -- 创建主页 - 使用全屏
    local page_w, page_h = lcd.getSize()
    local home = ui.window({
        background_color = ui.COLOR_WHITE,
        x = 0, y = 0, w = page_w, h = page_h  -- 全屏窗口
    })
    home.visible = true

    -- 配置子页面工厂
    home:configure_subpages({
        component = function() return require("component_page").create(ui) end,
        default_font = function() return require("default_font_page").create(ui) end,
        hzfont = function() return require("hzfont_page").create(ui) end
    })

    -- 标题 - 居中显示
    local title = ui.label({
        x = 325,           -- 居中计算: (800 - 文字宽度)/2,近似值
        y = 50,
        text = "exEasyUI演示系统",
        color = ui.COLOR_BLACK,
        size = 20          -- 增大字号
    })

    local subtitle = ui.label({
        x = 280,           -- 居中显示
        y = 80,
        text = "基于exEasyUI v1.7.0开发 - 800*480分辨率",
        color = ui.COLOR_GRAY,
        size = 14
    })

    -- 按钮布局 - 使用800宽度的新布局
    local btn_width = 340  -- 按钮宽度增大
    local btn_height = 60  -- 按钮高度增大
    local btn_x = 40       -- 左侧起始位置
    local btn_spacing = 70 -- 按钮间距

    -- 组件演示按钮
    local btn_component = ui.button({
        x = btn_x,
        y = 150,
        w = btn_width,
        h = btn_height,
        text = "组件演示",
        bg_color = ui.COLOR_BLUE,
        text_color = ui.COLOR_WHITE,
        font_size = 16,    -- 增大按钮文字
        on_click = function()
            home:show_subpage("component")
        end
    })

    -- 默认字体演示按钮
    local btn_default_font = ui.button({
        x = btn_x + btn_width + 40,  -- 右侧按钮
        y = 150,
        w = btn_width,
        h = btn_height,
        text = "默认字体演示",
        bg_color = ui.COLOR_RED,
        text_color = ui.COLOR_WHITE,
        font_size = 16,
        on_click = function()
            home:show_subpage("default_font")
        end
    })

    -- HZFont演示按钮
    local btn_hzfont = ui.button({
        x = btn_x,
        y = 150 + btn_height + btn_spacing,
        w = btn_width,
        h = btn_height,
        text = "HZFont演示",
        bg_color = ui.COLOR_ORANGE,
        text_color = ui.COLOR_WHITE,
        font_size = 16,
        on_click = function()
            home:show_subpage("hzfont")
        end
    })

    -- 添加所有组件到窗口
    home:add(title)
    home:add(subtitle)
    home:add(btn_component)
    home:add(btn_default_font)
    home:add(btn_hzfont)

    ui.add(home)
end

return home_page
6.8 component_page.lua
本文件为组件演示页面功能模块,核心业务逻辑为:
1、创建带上下滚动功能的演示窗口;
2、展示进度条、消息框、按钮、复选框、输入框、下拉框、图片轮播等UI组件;
3、演示组件的交互功能和事件处理;
4、提供返回主页的导航功能;
local component_page = {}

--[[
创建组件演示页面;

@api component_page.create(ui)
@summary 创建组件演示页面界面
@table ui UI库对象
@return table 组件演示窗口对象

@usage
-- 在子页面工厂中调用创建组件演示页面
local component_page = require("component_page").create(ui)
]]
function component_page.create(ui)
    local win = ui.window({
        background_color = ui.COLOR_WHITE,
        x = 0,
        y = 0,
        w = 800,
        h = 480 -- 全屏窗口
    })

    -- 启用滚动
    win:enable_scroll({
        direction = "vertical",
        content_height = 600,
        threshold = 10
    })

    -- 标题 - 居中
    local title = ui.label({
        x = 300,
        y = 25,
        text = "组件演示页面",
        color = ui.COLOR_BLACK,
        size = 20
    })

    -- 返回按钮
    local btn_back = ui.button({
        x = 20,
        y = 20,
        w = 80,
        h = 40,
        text = "返回",
        font_size = 14,
        on_click = function()
            win:back()
        end
    })

    -- ==================== 布局参数 ====================
    local column1_x = 40  -- 第一列起始位置
    local column2_x = 420 -- 第二列起始位置(800宽度分两列)
    local start_y = 80
    local spacing_y = 50

    -- ==================== 1. 进度条组件演示 ====================
    local progress_label = ui.label({
        x = column1_x,
        y = start_y,
        text = "1. 进度条组件:",
        color = ui.COLOR_BLACK,
        size = 16
    })

    local progress_value = 0
    local progress_bar = ui.progress_bar({
        x = column1_x,
        y = start_y + 30,
        w = 240,
        h = 30,
        progress = progress_value
    })

    local btn_progress = ui.button({
        x = column1_x + 250,
        y = start_y + 30,
        w = 100,
        h = 30,
        text = "+10%",
        on_click = function()
            progress_value = progress_value + 10
            if progress_value > 100 then
                progress_value = 0
            end
            progress_bar:set_progress(progress_value)
            progress_bar:set_text("进度: " .. progress_value .. "%")
        end
    })

    -- ==================== 2. 输入框组件演示 ====================
    local input_label = ui.label({
        x = column1_x,
        y = start_y + spacing_y + 40,
        text = "2. 输入框组件:",
        color = ui.COLOR_BLACK,
        size = 16
    })

    -- 普通文本输入框
    local text_input = ui.input({
        x = column1_x,
        y = start_y + spacing_y + 70,
        w = 350,
        h = 40,
        placeholder = "请输入文本...",
        max_length = 20
    })

    -- 密码输入框
    local password_input = ui.input({
        x = column1_x,
        y = start_y + spacing_y + 120,
        w = 350,
        h = 40,
        placeholder = "请输入密码...",
        input_type = "password",
        max_length = 16
    })

    -- 数字输入框
    local number_input = ui.input({
        x = column1_x,
        y = start_y + spacing_y + 170,
        w = 350,
        h = 40,
        placeholder = "请输入数字...",
        input_type = "number",
        max_length = 16
    })

    -- ==================== 3. 按钮组件演示 ====================
    local button_label = ui.label({
        x = column1_x,
        y = start_y + spacing_y * 2 + 200,
        text = "3. 按钮组件:",
        color = ui.COLOR_BLACK,
        size = 16
    })

    -- 普通按钮
    local normal_btn = ui.button({
        x = column1_x,
        y = start_y + spacing_y * 2 + 230,
        w = 100,
        h = 40,
        text = "普通按钮",
        on_click = function()
            log.info("component_page", "普通按钮被点击")
        end
    })

    -- 带颜色的按钮
    local colored_btn = ui.button({
        x = column1_x + 110,
        y = start_y + spacing_y * 2 + 230,
        w = 100,
        h = 40,
        text = "蓝色按钮",
        bg_color = ui.COLOR_BLUE,
        text_color = ui.COLOR_WHITE,
        on_click = function()
            log.info("component_page", "蓝色按钮被点击")
        end
    })

    -- 图片按钮
    local image_btn = ui.button({
        x = column1_x + 220,
        y = start_y + spacing_y * 2 + 220,
        w = 64,
        h = 64,
        src = "/luadb/4.jpg",
        src_toggled = "/luadb/5.jpg",
        toggle = true,
        on_click = function()
            log.info("component_page", "图片按钮被点击")
        end
    })
    -- ==================== 4. 复选框组件演示 ====================
    local checkbox_label = ui.label({
        x = column2_x,
        y = start_y,
        text = "4. 复选框组件:",
        color = ui.COLOR_BLACK,
        size = 16
    })

    local checkbox1 = ui.check_box({
        x = column2_x,
        y = start_y + 35,
        text = "选项A",
        checked = false,
        on_change = function(checked)
            log.info("component_page", "选项A:", checked)
        end
    })

    local checkbox2 = ui.check_box({
        x = column2_x + 100,
        y = start_y + 35,
        text = "选项B",
        checked = true,
        on_change = function(checked)
            log.info("component_page", "选项B:", checked)
        end
    })

    -- ==================== 5. 下拉框组件演示 ====================
    local combo_label = ui.label({
        x = column2_x,
        y = start_y + spacing_y + 30,
        text = "5. 下拉框组件:",
        color = ui.COLOR_BLACK,
        size = 16
    })

    local combo_box = ui.combo_box({
        x = column2_x,
        y = start_y + spacing_y + 60,
        w = 350,
        h = 40,
        options = { "选项1", "选项2", "选项3", "选项4", "选项5" },
        placeholder = "请选择",
        selected = 1,
        on_select = function(value, index, text)
            log.info("component_page", "选择了:", text, "索引:", index)
        end
    })

    -- ==================== 6. 消息框组件演示 ====================
    local msgbox_label = ui.label({
        x = column2_x,
        y = start_y + spacing_y * 2 + 60,
        text = "6. 消息框组件:",
        color = ui.COLOR_BLACK,
        size = 16
    })

    local btn_msgbox = ui.button({
        x = column2_x,
        y = start_y + spacing_y * 2 + 90,
        w = 150,
        h = 40,
        text = "弹出消息框",
        on_click = function()
            local message_box = ui.message_box({
                x = 200,
                y = 150, -- 居中显示
                w = 400,
                h = 200,
                title = "提示",
                message = "这是一个exEasyUI消息框演示",
                buttons = { "确定", "取消" },
                on_result = function(button_index)
                    log.info("component_page", "点击了按钮:", button_index)
                end
            })
            ui.add(message_box)
        end
    })

    -- ==================== 7. 图片轮播组件演示 ====================
    local picture_label = ui.label({
        x = column2_x,
        y = start_y + spacing_y * 3 + 90,
        text = "7. 图片轮播组件:",
        color = ui.COLOR_BLACK,
        size = 16
    })

    local picture = ui.picture({
        x = column2_x,
        y = start_y + spacing_y * 3 + 120,
        w = 460,
        h = 150, -- 增大尺寸
        sources = { "/luadb/1.jpg", "/luadb/2.jpg", "/luadb/3.jpg" },
        autoplay = true,
        interval = 2000
    })

    -- 添加所有组件到窗口
    win:add(title)
    win:add(btn_back)
    win:add(progress_label)
    win:add(progress_bar)
    win:add(btn_progress)
    win:add(checkbox_label)
    win:add(checkbox1)
    win:add(checkbox2)
    win:add(input_label)
    win:add(text_input)
    win:add(password_input)
    win:add(number_input)
    win:add(combo_label)
    win:add(combo_box)
    win:add(button_label)
    win:add(normal_btn)
    win:add(colored_btn)
    win:add(image_btn)
    win:add(msgbox_label)
    win:add(btn_msgbox)
    win:add(picture_label)
    win:add(picture)

    return win
end

return component_page
6.9 default_font_page.lua
本文件为默认字体演示页面功能模块,核心业务逻辑为:
1、创建演示窗口,展示内置12号点阵字体的固定大小特性;
2、演示数字、符号、中英文混排的显示效果;
3、展示默认字体的特性和限制说明;
4、提供返回主页的导航功能;
local default_font_page = {}

function default_font_page.create(ui)
    local win = ui.window({
        background_color = ui.COLOR_WHITE,
        x = 0, y = 0, w = 800, h = 480
    })

    -- 标题
    local title = ui.label({
        x = 280, y = 25,
        text = "默认字体演示 - 12号点阵字体",
        color = ui.COLOR_BLACK,
        size = 12
    })

    -- 返回按钮
    local btn_back = ui.button({
        x = 20, y = 20,
        w = 80, h = 35,
        text = "返回",
        on_click = function()
            win:back()
        end
    })

    -- -- ==================== 左栏:字体基础演示 ====================
    local left_column_x = 40

    local demo_title = ui.label({
        x = left_column_x, y = 80,
        text = "字体基础演示:",
        color = ui.COLOR_BLACK,
        size = 12
    })

    -- 数字演示
    local number_demo = ui.label({
        x = left_column_x, y = 110,
        text = "数字演示:",
        color = ui.COLOR_BLUE,
        size = 12
    })

    local number_content = ui.label({
        x = left_column_x + 70, y = 110,
        text = "0123456789",
        color = ui.COLOR_BLUE,
        size = 12
    })

    -- 符号演示
    local symbol_demo = ui.label({
        x = left_column_x, y = 140,
        text = "符号演示:",
        color = ui.COLOR_RED,
        size = 12
    })

    local symbol_content = ui.label({
        x = left_column_x + 70, y = 140,
        text = "!@#$%^&*()_+-=[]{}|;:,.<>?/",
        color = ui.COLOR_ORANGE,
        size = 12
    })

    -- 英文字母演示
    local letter_demo = ui.label({
        x = left_column_x, y = 170,
        text = "英文字母:",
        color = ui.COLOR_GREEN,
        size = 12
    })

    local letter_content = ui.label({
        x = left_column_x + 70, y = 170,
        text = "ABCDEFGHIJKLMNOPQRSTUVWXYZ",
        color = ui.COLOR_RED,
        size = 12
    })

    -- 中文演示
    local chinese_demo = ui.label({
        x = left_column_x, y = 200,
        text = "中文演示:",
        color = ui.COLOR_MAGENTA,
        size = 12
    })

    local chinese_content = ui.label({
        x = left_column_x + 70, y = 200,
        text = "天地玄黄宇宙洪荒日月盈昃辰宿列张",
        color = ui.COLOR_MAGENTA,
        size = 12
    })

    -- 中英文混排演示
    local mix_demo = ui.label({
        x = left_column_x, y = 230,
        text = "中英文混排:",
        color = ui.COLOR_BLACK,
        size = 12
    })

    local mix_content = ui.label({
        x = left_column_x + 70, y = 230,
        text = "Hello 世界! ABC 123 测试 Test 演示 Demo",
        color = ui.COLOR_BLUE,
        size = 12
    })

    -- 完整句子演示
    local sentence_title = ui.label({
        x = left_column_x, y = 270,
        text = "完整句子演示:",
        color = ui.COLOR_BLACK,
        size = 12
    })

    local sentence1 = ui.label({
        x = left_column_x, y = 290,
        text = "LuatOS是合宙通信推出的开源嵌入式物联网操作系统",
        color = ui.COLOR_GRAY,
        size = 12
    })

    local sentence2 = ui.label({
        x = left_column_x, y = 310,
        text = "默认字体为12号点阵字体,启动快速,资源占用小",
        color = ui.COLOR_GRAY,
        size = 12
    })

    local sentence3 = ui.label({
        x = left_column_x, y = 330,
        text = "支持中英文、数字和常用符号的显示",
        color = ui.COLOR_GRAY,
        size = 12
    })

    -- -- ==================== 右栏:字体特性说明 ====================
    local right_column_x = 420

    local feature_title = ui.label({
        x = right_column_x, y = 80,
        text = "默认字体特性说明:",
        color = ui.COLOR_BLACK,
        size = 12
    })

    local feature1_title = ui.label({
        x = right_column_x + 20, y = 120,
        text = "-固定大小特性:",
        color = ui.COLOR_BLUE,
        size = 12
    })

    local feature1_desc = ui.label({
        x = right_column_x + 40, y = 140,
        w = 300,
        text = "内置12号点阵字体,字体大小固定为12号,不支持动态调整。",
        color = ui.COLOR_BLACK,
        size = 12
    })

    local feature2_title = ui.label({
        x = right_column_x + 20, y = 170,
        text = "-硬件要求:",
        color = ui.COLOR_GREEN,
        size = 12
    })

    local feature2_desc = ui.label({
        x = right_column_x + 40, y = 190,
        w = 300,
        text = "无需外部硬件支持,完全内置于系统中,启动即用。",
        color = ui.COLOR_BLACK,
        size = 12
    })

    local feature3_title = ui.label({
        x = right_column_x + 20, y = 220,
        text = "-性能优势:",
        color = ui.COLOR_RED,
        size = 12
    })

    local feature3_desc = ui.label({
        x = right_column_x + 40, y = 240,
        w = 300,
        text = "启动速度快,资源占用小,适合内存受限的嵌入式设备。",
        color = ui.COLOR_BLACK,
        size = 12
    })

    local feature4_title = ui.label({
        x = right_column_x + 20, y = 270,
        text = "-字符集支持:",
        color = ui.COLOR_MAGENTA,
        size = 12
    })

    local feature4_desc = ui.label({
        x = right_column_x + 40, y = 290,
        w = 300,
        text = "支持常用中文字符、英文字母、数字和符号的显示。",
        color = ui.COLOR_BLACK,
        size = 12
    })

    local feature5_title = ui.label({
        x = right_column_x + 20, y = 320,
        text = "-适用场景:",
        color = ui.COLOR_ORANGE,
        size = 12
    })

    local feature5_desc = ui.label({
        x = right_column_x + 40, y = 340,
        w = 300,
        text = "适用于需要快速启动、简单文本显示的应用场景。",
        color = ui.COLOR_BLACK,
        size = 12
    })

    -- 添加所有组件到窗口
    win:add(title)
    win:add(btn_back)

    -- -- 左栏组件
    win:add(demo_title)
    win:add(number_demo)
    win:add(number_content)
    win:add(symbol_demo)
    win:add(symbol_content)
    win:add(letter_demo)
    win:add(letter_content)
    win:add(chinese_demo)
    win:add(chinese_content)
    win:add(mix_demo)
    win:add(mix_content)
    win:add(sentence_title)
    win:add(sentence1)
    win:add(sentence2)
    win:add(sentence3)

    -- 右栏组件
    win:add(feature_title)
    win:add(feature1_title)
    win:add(feature1_desc)
    win:add(feature2_title)
    win:add(feature2_desc)
    win:add(feature3_title)
    win:add(feature3_desc)
    win:add(feature4_title)
    win:add(feature4_desc)
    win:add(feature5_title)
    win:add(feature5_desc)


    return win
end

return default_font_page
6.10 hzfont_page.lua
本文件为HZFont矢量字体演示页面预留模块
local hzfont_page = {}

function hzfont_page.create(ui)
    local win = ui.window({
        background_color = ui.COLOR_WHITE,
        x = 0, y = 0, w = 800, h = 480
    })


    -- 标题
    local title = ui.label({
        x = 300, y = 25,
        text = "HZFont矢量字体目前正在开发中。。。",
        color = ui.COLOR_BLACK,
        size = 20
    })
 -- 返回按钮
    local btn_back = ui.button({
        x = 20, y = 20,
        w = 80, h = 40,
        text = "返回",
        font_size = 14,
        on_click = function()
            win:back()
        end
    })

    -- 添加所有组件到窗口
    win:add(title)
    win:add(btn_back)

    return win
end

return hzfont_page
七、显示效果展示
7.1 硬件准备
- 按照硬件接线表连接所有设备
- 通过 TYPE-C USB 口供电
- 检查所有接线无误
7.2 软件配置
在main.lua中选择加载对应的模块:
-- 必须加载才能启用exeasyui的功能
ui = require("exeasyui")

-- 加载lcd、tp和字库驱动管理功能模块,有以下三种:
-- 1、使用lcd内核固件中自带的12号中文字体的hw_default_font_drv,并按lcd显示驱动配置和tp触摸驱动配置进行初始化
-- 2、使用hzfont核心库驱动内核固件中支持的软件矢量字库的hw_hzfont_drv.lua,并按lcd显示驱动配置和tp触摸驱动配置进行初始化
-- 3、使用自定义字体的hw_customer_font_drv(目前开发中)
-- 最新情况可查看模组选型手册中对应型号的固件列表内,支持的核心库是否包含lcd、tp、12号中文、hzfont,链接https://docs.openluat.com/air780epm/common/product/
-- 目前exeasyui V1.7.0版本支持使用已经实现的四种功能中的一种进行初始化,同时支持多种字体初始化功能正在开发中
require("hw_default_font_drv")
-- require("hw_hzfont_drv")开发中
-- require("hw_customer_font_drv")开发中

-- 加载exeassyui扩展库实现的用户界面功能模块
-- 实现多页面切换、触摸事件分发和界面渲染功能
-- 包含主页、组件演示页、默认字体演示页、HZfont演示页和自定义字体演示页

require("ui_main")
7.3 软件烧录
- 使用Luatools烧录最新内核固件
- 下载并烧录本项目所有脚本文件
- 将字体文件和图片文件随脚本文件一起烧录到脚本分区
- 烧录成功后设备自动重启后开始运行
7.4 功能测试
7.4.1 主页面操作
- 设备启动后显示主页面,包含三个功能按钮
- 查看系统标题和版本信息
- 点击各功能按钮进入对应演示页面
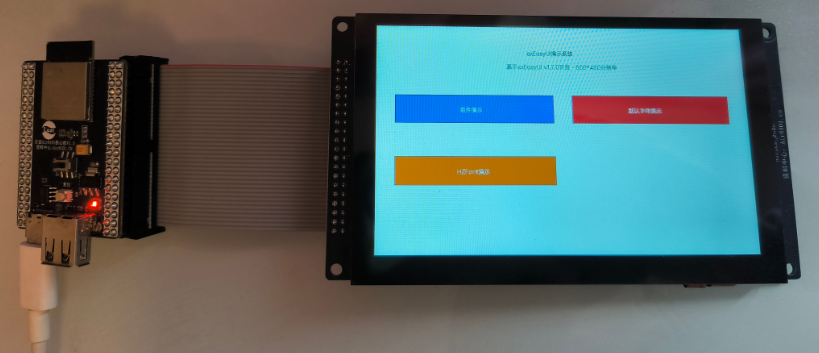
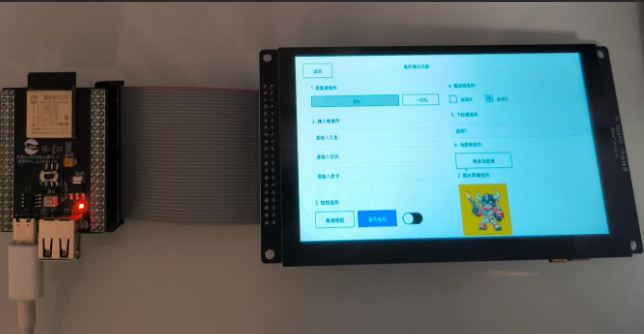
7.4.2 组件演示页面
- 测试进度条组件的动态更新
- 在输入框中输入文本测试
- 点击按钮查看打印日志
- 操作复选框查看状态变化
- 体验消息框的弹出和按钮响应
- 使用下拉框选择选项
- 查看图片轮播效果(如有图片文件)
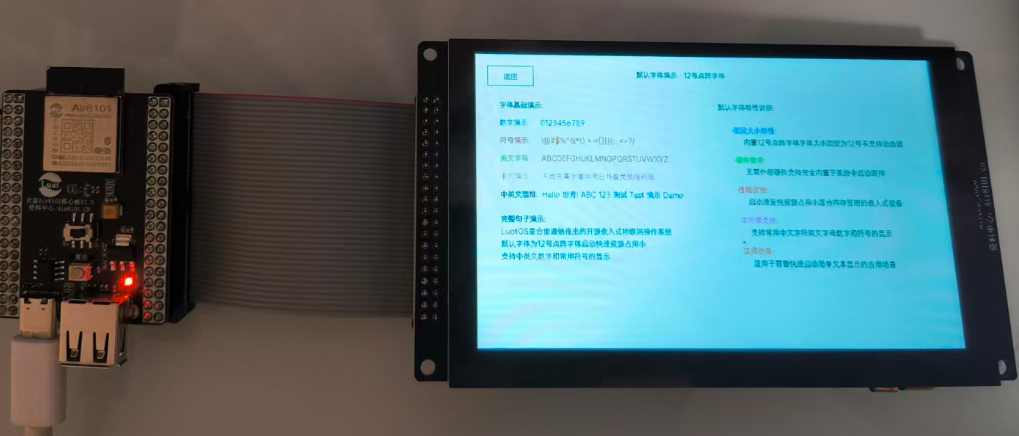
7.4.3 字体演示页面
- 默认字体页:查看固定 12 号字体的颜色和中英文显示
- 在各页面使用返回按钮回到主页
默认字体页
7.5 预期效果
- 系统启动:正常初始化,显示主页面
- 页面切换:流畅的页面过渡效果
- 组件交互:所有 UI 组件响应灵敏
- 字体显示:各字体页面正常显示,动态调整功能正常
- 触摸操作:准确的触摸定位和事件响应
八、常见问题
- 显示异常:检查 LCD 接线,确认对应驱动文件中的硬件参数正确
- 触摸无响应:检查 I2C 接线,确认触摸芯片型号配置正确
- 字体显示异常:确认选择的字体驱动与硬件匹配
- 图片无法显示:确认图片文件已正确烧录到指定路径
- 系统卡顿:调整
ui_main.lua中的sys.wait(time)刷新率参数